Happy Monday! Last week, I shared a to-die-for homemade cherry pie filling recipe. Later this week, I’ll talk about the tarts that I used the filling in. In keeping with my cherry theme, today’s post is a crochet pattern to make the cutest Amigurumi cherries you ever did see! Maybe I’ll have to do some cherry nail art this week too, to round off my week of cherries!
I decided to make these cutie pie cherries because I really want a fruit bowl on my kitchen table. It’s too hot and humid for real fruit to last more than a few days at a time (and I’m not trying to fill my house with fruit flies!!), so I thought I should just crochet myself a super cute bowl of fruit! Over the next few weeks, I will share the different fruit patterns I am using to do so (think: lemons, limes, oranges and more!) It will be adorable when it’s all done!
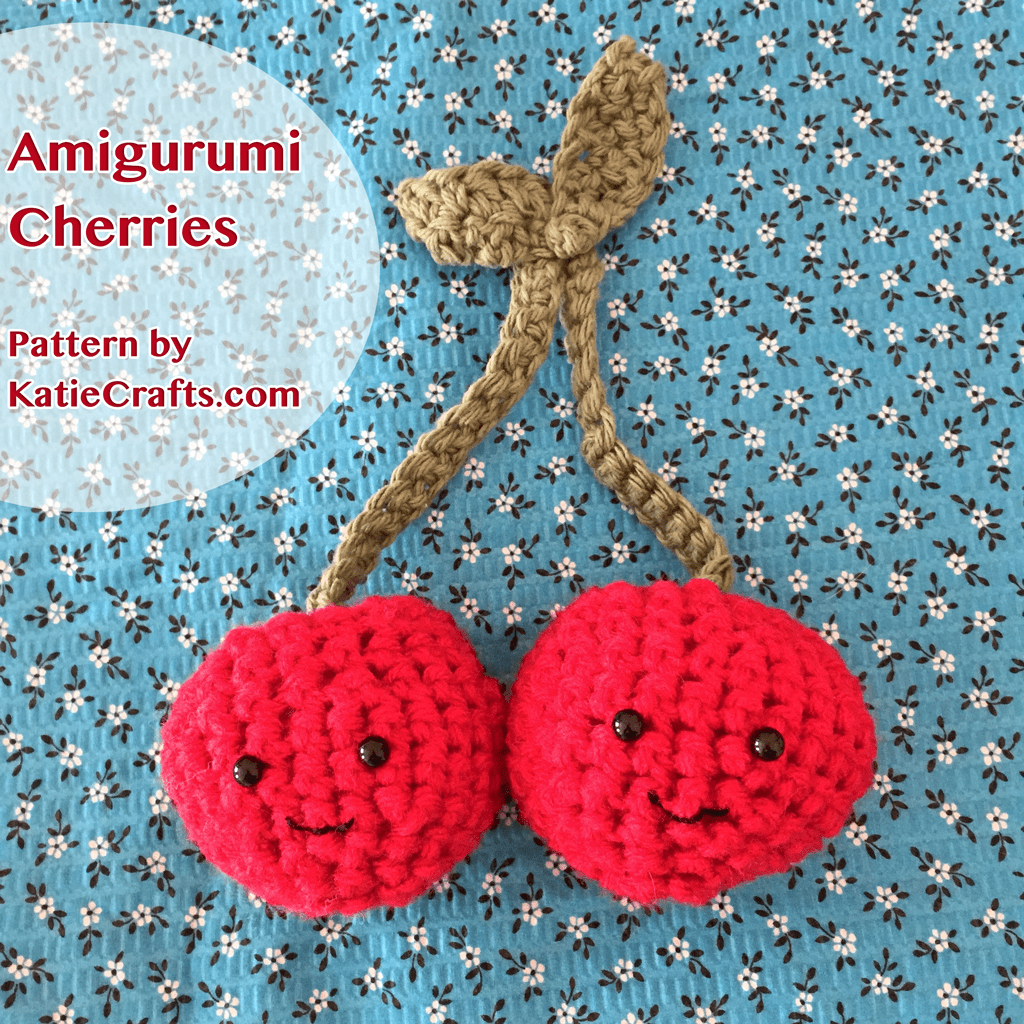
Okay, on to the first fruit to hit the bowl: Cherries!
Materials:
- Yarn, worsted weight, in red and green
- I9 crochet hook
- Stuffing/polyfill
- 2 Solid black safety eyes, 6mm (with backs)
- Embroidery floss, black
- Embroidery needle
- Yarn needle
- Stitch marker
Pattern Notes:
ch = chain
dc = double crochet
dec = decrease
rep = repeat
sl st = slip stitch
sc = single crochet
st = stitch
If I say to do something “around til end,” I mean to do it until you arrive back to the stitch marker. Always move your stitch marker up after each round to keep it consistent.
If two actions are listed and they aren’t in parentheses, do them in different stitches, not the same stitch. Example: 1 sc, 1 inc, rep around til end. This means do a single crochet in the first available stitch, and an increase in the second available stitch. Then repeat these actions until you hit your stitch marker.
Instructions:
Cherries-
- Ch 5, join with sl st to form ring
- Round 1: inc in each st (10) — place stitch marker
- Round 2: 1 sc, 1 inc, rep around til end (15)
- Round 3: 2 sc, 1 inc, rep around til end (20)
- Round 4: 3 sc, 1 inc, rep around til end (25)
- Round 5: sc in each st around til end (25)
- Round 6: repeat round 5 (25)
- Round 7: 3 sc, 1 dec, rep around til end (20)
- Round 8: sc in each st around til end (20)
- Round 9: 2 sc, 1 dec, rep around til end (15)
- Take a break from crocheting for a moment. Decide where you want your eyes to be and follow instructions on safety eyes package to attach them. Then use embroidery floss and needle to stitch on a mouth. Make sure it’s secured so it cannot be pulled out. Then add your stuffing, shaping the cherry into a cute little ball. Okay, continue crocheting now!
- Round 10: 1 sc, 1 dec, rep around til end (10)
- Round 11: remove stitch marker and dec til closed, finish off. Weave in ends.
Stem-
- Round 1: ch 35
- Round 2: sc in second ch from hook, and then sc in each remaining ch until end.
- Finish off.
Leaves (Make Two)-
- Round 1: ch 8 (or more, if you want bigger leaves!)
- Round 2: In second ch from hook, 1 sc, then dc in next ch. Rep sc, dc til end. Turn.
- Round 3: Repeat round 2.
- Finish off, leaving long tail.
After all pieces are made, use crochet hook, yarn needle and tails/yarn to sew everything together. Sew stems into center top of cherries. Sew leaves together (one on top of other). Sew leaves to top of stems. Enjoy your smiley little cherries!
Hi!Which piece of fruit should I tackle next for my fruit bowl?
Very cute baby cherries! 🙂 Cannot eat them if they are smiling to me 🙂
They’re so cute!! I would love a pair of these cherries!