Project: DIY Circle Skirt Tutorial
Today, I’m going to teach you the tutorial I’ve been really excited about since the day I learned how to turn on my sewing machine! Circle skirts are one of my favoritest things ever (what girl doesn’t love to twirl?), so I was both happy and terrified to try my hand at making one. I went through many other projects first, biding my time and avoiding making a skirt that I was going to destroy with my lack of skills. I also assumed (incorrectly, might I add!) that all apparel, particularly the circle skirt, would be too hard for my beginner abilities. With summer just around the corner and a new wardrobe quite literally at my fingertips, I decided to bite the bullet and give it a try. I’m so glad I did!
For this project, you’re going to need to do a few calculations. You’ll also need a ton of fabric. Unlike, say, a pencil skirt, which hugs your body and uses only the fabric that measures around you once, the circle skirt needs to spin (in a circle!) and requires a LOT more! Luckily, I found a great coupon over at Flipit to Jo-Ann Fabric, so I was able to get a big discount on my order! Thank goodness, because fabric can get quite expensive. Okay, on to the materials!
Materials:
- 2-4 yards of fabric (we’ll calculate the exact amount later, as the amount depends on your waist size and how long you want your skirt to be)
- 3″ wide elastic, 1 yard (again, the exact amount in inches will depend on your waist- but 1 yard will do it!)
- Measuring tape, sewing machine, tape, paper, matching thread, scissors, iron (optional), pinking shears (optional), pencil/chalk, tons of pins
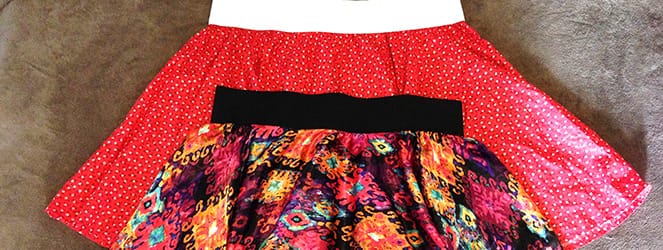
Type of fabric: I used a poly-cotton blend (65% Polyester 35% Cotton) for this skirt. It has a little stretch to it and happens to be quite textured, which I couldn’t tell by the photo online. I wasn’t sure I’d like it for a skirt, but I do! It’s mega cute and drapes really well. The other skirt in the featured photo was made with 100% Polyester Charmuese- and the way it drapes and feels is wonderful! It also has a little stretch, which really helps in this project. Any lightweight fabric (that won’t bunch or add bulk to the hips) should work!

This tutorial specifically uses a fabric that was too small to cut a full donut/circle with, so you can see what to do if your material isn’t wide enough. The fabric for the other skirt in the featured image was wide enough and therefore did not need the extra steps. Both skirts twirl exactly the same, so don’t worry about losing anything in making two halves sewn together rather than one whole right off the bat- I love both versions of this skirt!

Instructions:
First things first: take a couple of measurements.
Measurements:
- Using your measuring tape, measure around your waist where you plan for the waistband to lay. Add one inch for seam allowances/hem. Mark that number down as your “waist length.”
- Next, measure from the same spot around your waist, down to where you want your skirt to end. I wanted mine to be a little longer than knee length for optimal opportunities to spin in public. Add one inch for seam allowance/hem. Mark this number down as your “skirt length.”
On to the math and calculations portion of the tutorial. Don’t worry, it isn’t too long or difficult! If you don’t want to read further in to it and just want the basics and formulas, look for the italicized areas! I urge you to read everything though, as it should answer any questions you have going forward.
circumference of fabric = your waist length + 2″
radius of fabric = distance from the middle/inside of the circle to the end/outside of the circle
pi = 3.14
Since you now know the circumference, and what pi is, you can work backwards to find the radius.
formula: r = c / (pi * 2)
OR
radius = your waist length + 2″ (the number you figured out as your circumference a moment ago!), /divided by 6.28
SO, for example, if your waist length is 36″ you will add 2″ to it for hems, etc., and your magic circumference number is now 38. Divide that by 6.28 and you have 6.05. Round that to the nearest quarter inch, and you have 6 inches. This is your radius!
To figure out how much fabric you will need:
formula: fabric = r + skirt length (*4)
Working the above formula, add your radius to your skirt length. This gives you one quarter of the skirt. Multiply that by four and you’ll have how many inches of fabric you need in length! The width of the fabric also needs to be large enough to accommodate half the skirt. This means that if your fabric is only 45″ wide, and your skirt length + radius is a total 23″ or more (which is 46″ or more for half the skirt), a 45″ wide fabric won’t work. Again, this was the case for this particular skirt. This just means instead of cutting out one giant circle, you’ll cut out two semi circles and sew them together. It doesn’t add on too much time, and it still twirls just as wonderfully!
BOOM! You’re done with the math!
Steps on making the skirt:
- First off, we can cut and sew the elastic and set it aside.
Using your initial waist measurement minus two inches, measure and cut your elastic.
I’ve read many tutorials that recommend you add inches to the elastic before cutting it. I was weary of this (it is ELASTIC after all, it stretches!) so I went with my initial waist measurement minus one inch, which ended up still being a little loose. On my second skirt I subtracted two inches and it was perfect!
- Fold your elastic in half and do a straight stitch across the open ends, with about a half inch seam allowance. Back stitch, go forward, back stitch and forward again. The most pressure/stretch is going to be on this stitch! If it’s not reinforced, your skirt could fall apart!
- Trim the excess and press open as flat as you can get it. Stitch down if you like. Add label here if you have one!


- Now for the pattern. You can skip making a paper pattern if you don’t think you’ll be making more than one skirt, but I knew I would be and so a paper pattern was a must (or else I’d have to do all these calculations and whatnot again next time!)
- Tape a whole bunch of papers together! You’ll be working from the corner, so it needs to be at least as long on each side as the length of your radius + the length of your skirt.

- Use a ruler or your measuring tape to measure out your radius from the corner on one side, then the other.
- Turn your ruler or measuring tape a little bit and mark it over and over, until you have a little arc of dots.
- Connect the dots!


- Now from that new line (not from the corner, any more!), measure your skirt length! My desired length was 20″ +1″ for hem, so I measured 21″ down and marked it. Do the same procedure you did a moment ago, making a series of dots all the way around in an arc.

- Connect the dots again!

- Now cut along your lines and you have your pattern, which is precisely one quarter of your skirt! It looks huge- imagine how gigantic it’s going to be when you have a full skirt!

- If your fabric is wide enough to accommodate one whole circle, you will simply fold your fabric in fourths, lining up the folds with the pattern. If your fabric is not wide enough and you need to make two halves of a circle, fold the fabric (as shown below) in half, lining up the folds with the pattern. Make sure fabric is wrong side up, so that you can make marks on it. *Tip: use a pencil or chalk to mark folds to be sure everything is even!


- Pin the pattern on to the fabric.
- Carefully follow the fabric and cut out the middle and the outside, creating either one large donut, or two donut halves.

If you have a large donut, you can skip the next two steps!
- With right sides of fabric facing, pin both of the open sides together (so that if it were opened, it WOULD form a donut)
- With matching thread and a straight stitch, sew the length of each side. Cut off any excess and don’t forget the back stitching! Now you have a large donut circle skirt!


- I don’t have a serger, so I couldn’t finish the ends of all the fabric with a nice stitch, but I still wanted to strengthen the end where the elastic would be stretching so it had a little more reinforcement. So, I used a simple zig zag stitch all the way around the radius/top circle.

- Fold up the bottom of the skirt about a half an inch and pin ALL the way around. This part took the longest, so I made sure to turn on some terrible guilty pleasure reality TV so I had something to listen to as I did it!


- Next, I pressed (with my iron, using the steam setting) the hem to make it easier for sewing. This part isn’t mandatory, but it makes it a whole lot easier, especially with fabric that has texture or stretch.

- Using matching thread and a straight stitch, sew the hem all the way around, about 1/4″ – 1/2″ hem. Trim off excess from inside if there is a lot left over!

- Lay your skirt and elastic next to each other. Your skirt opening/radius should be larger than the elastic.

- Pin your elastic in 8 different spots to your skirt opening, on the outside of your fabric (your elastic is going to be a ‘belt’ that is visible, so you want that on the outside, and the fabric on the inside). You’ll need to stretch the elastic to make sure it’s even when you pin it. I pinned it about 1/2 inch to 3/4 of an inch up. It will look ridiculous- but that’s okay!

- Time to sew! Going slowly with a straight stitch (or zig zag, if that’s what you prefer!), gently stretch the elastic from pin to pin as you sew it on to the fabric underneath. It’s pretty easy, even if it sounds scary.
- Don’t forget to back stitch!
- Remove pins. You’re done!
- Wear and twirl and make another!


If you use my tutorial, share pics of your final product in the comments below! I’d love to see what you’ve made! If you have other tips for making this tutorial, let me know!
Love your skirt! Fantastic DIY! Thank you!
Thanks Natalia!
Cute skirt! It’d be fun to belly dance on the beach in this summer.
Great idea! I bet it would too!
I’d be all over this, if I knew how to sew. I can’t even sew a button back off if one falls off. I’m really bad! =0(
I said the same thing just a couple of months ago! I still can’t do anything fancy, but since this is all pretty straight stitching on the machine it was pretty easy. Definitely not as scary as I thought it would be! 🙂
Great DIY Katie! I love circle skirts. They’re so fun to twirl in. Thanks a lot for sharing the tutorial!
Thanks! I love them too- any reason to twirl!
A skirt is a tube- or cone-shaped garment that hangs from the waist or hips and covers all or part of the legs. There are a number of garments marketed to men which fall under the category of “skirt” or “dress.” These go by a variety of names and form part of the traditional dress for men from various cultures For more skirtShoppal and Coupondesh are all about deals, discounts and coupons.