Vintage Hat Crochet Pattern
One of my favorite things to buy when I head to the bookstore with Husband is crafting and crochet magazines. A few months ago I bought
magazine’s Fall issue and in it was a Vintage Hat pattern that I have used a ton of times already. I’m not kidding- I’ve made 7 of these hats already! They are SUPER easy and work up very quickly, so I can knock one out in under two hours, making them fantastic Christmas gifts.
While I can take no credit for this pattern (the designer is Amy Polcyn), I wanted to share it with you so that you may use it too! If you have a skein of yarn, a hook and two hours to spare, you can take away a really cute vintage inspired hat! For more info on Amy’s pattern, check
. Below I have copied Amy’s instructions verbatim, but added a couple of notes in the materials section that I found handy as I made these hats! Hope you find them useful too!
Materials:
-
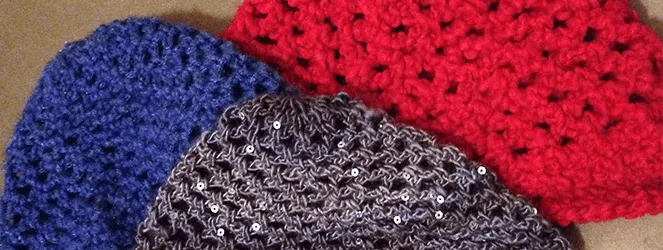
1 skein of yarn, light to bulky weight* (Unsure of your yarn’s weight?
Pictured above are three different weights of yarn so you can see what the different hats would look like!)
-
U.S. size H-8 to K-10 crochet hook (depending on which yarn you chose)
-
Stitch marker**
-
Yarn needle (optional)***
-
Scissors
*Bulky (like the red hat) is already a little difficult to work with in this pattern, so I wouldn’t recommend using anything bigger!
**I never have stitch markers laying around, so I usually just use a small scrap of contrasting yarn and tie it where I would have placed a stitch marker.
***You can use a yarn needle to weave in ends at the end of this project, but it’s also feasible to weave them in using your crochet hook!
Need a refresher course in abbreviations and terminology?
Instructions:
Gauge
Rnds 1-3 = 2 1/2″ (6cm)
Note
Work in continuous rounds, moving marker up as work progresses. Do not join unless otherwise instructed.
Pattern
Ch 4, join with sl st to form a ring.
Rnd 1:
[Ch 3, sc 1 in ring] 6 times. (6 ch-3 sps)
Rnd 2:
[Ch 3, sc 1 in next ch-3 sp, ch 3, sc 1 in sc] 6 times. (12 ch-3 sps)
Rnd 3:
*Ch 3, sc 1 in next ch-3 sp; rep from * around.
Rnds 4 and 5:
Rep rnd 3.
Rnd 6:
*[Ch 3, sc 1 in next ch-3 sp] 4 times, ch 3, sc 1 in next sc; rep from * around. (15 ch-3 sps)
Rnd 7:
Rep rnd 3.
Rnd 8:
*[Ch 3, sc 1 in next ch-3 sp] 5 times, ch 3, sc 1 in next sc; rep from * around. (18 ch-3 sps)
Rnd 9:
Rep rnd 3.
Rnd 10:
*[Ch 3, sc 1 in next ch-3 sp] 6 times, ch 3, sc 1 in next sc; rep from * around. (21 ch-3 sps)
Rnd 11:
Rep rnd 3.
Rnd 12:
*[Ch 3, sc 1 in next ch-3 sp] 7 times, ch 3, sc 1 in next sc; rep from * around. (24 ch-3 sps)
Rnd 13:
Rep rnd 3.
Rnd 14:
*[Ch 3, sc 1 in next ch-3 sp] 8 times, ch 3, sc 1 in next sc; rep from * around. (27 ch-3 sps)
Rnd 15-20:
Rep rnd 3.
Rnd 21:
*2 sc in next ch-3 sp, skip next sc, 2 sc in following ch-3 sp, sc 1 in sc; rep from * around, ending 2 sc in last ch-3 sp, skip last sc.
Rnds 22 – 24:
Sc 1 in each sc around. At end of last rnd, join with sl st. Fasten off.
Finishing
Weave in ends. Block.
That’s it! This is such a great pattern to do while watching TV because before you know it it’s finished and it doesn’t take a lot of concentration to complete. Hope you like it!
What is your favorite hat pattern? Share it in the comments!